Python venv Explained: Create, Activate, and Use It
Python venv explained simply: what it is, why every project needs one, and the exact commands to create, activate, and use it, including the #1 beginner mistake.

A virtual environment is a private, isolated copy of Python for one project, its own interpreter, its own installed packages, completely separate from every other project on your machine. This lesson explains why that isolation matters and gives you the exact commands to create, activate, and use one.
By the end, you'll have a venv running in your project folder with the anthropic package installed inside it, not floating around globally.
Key Takeaways
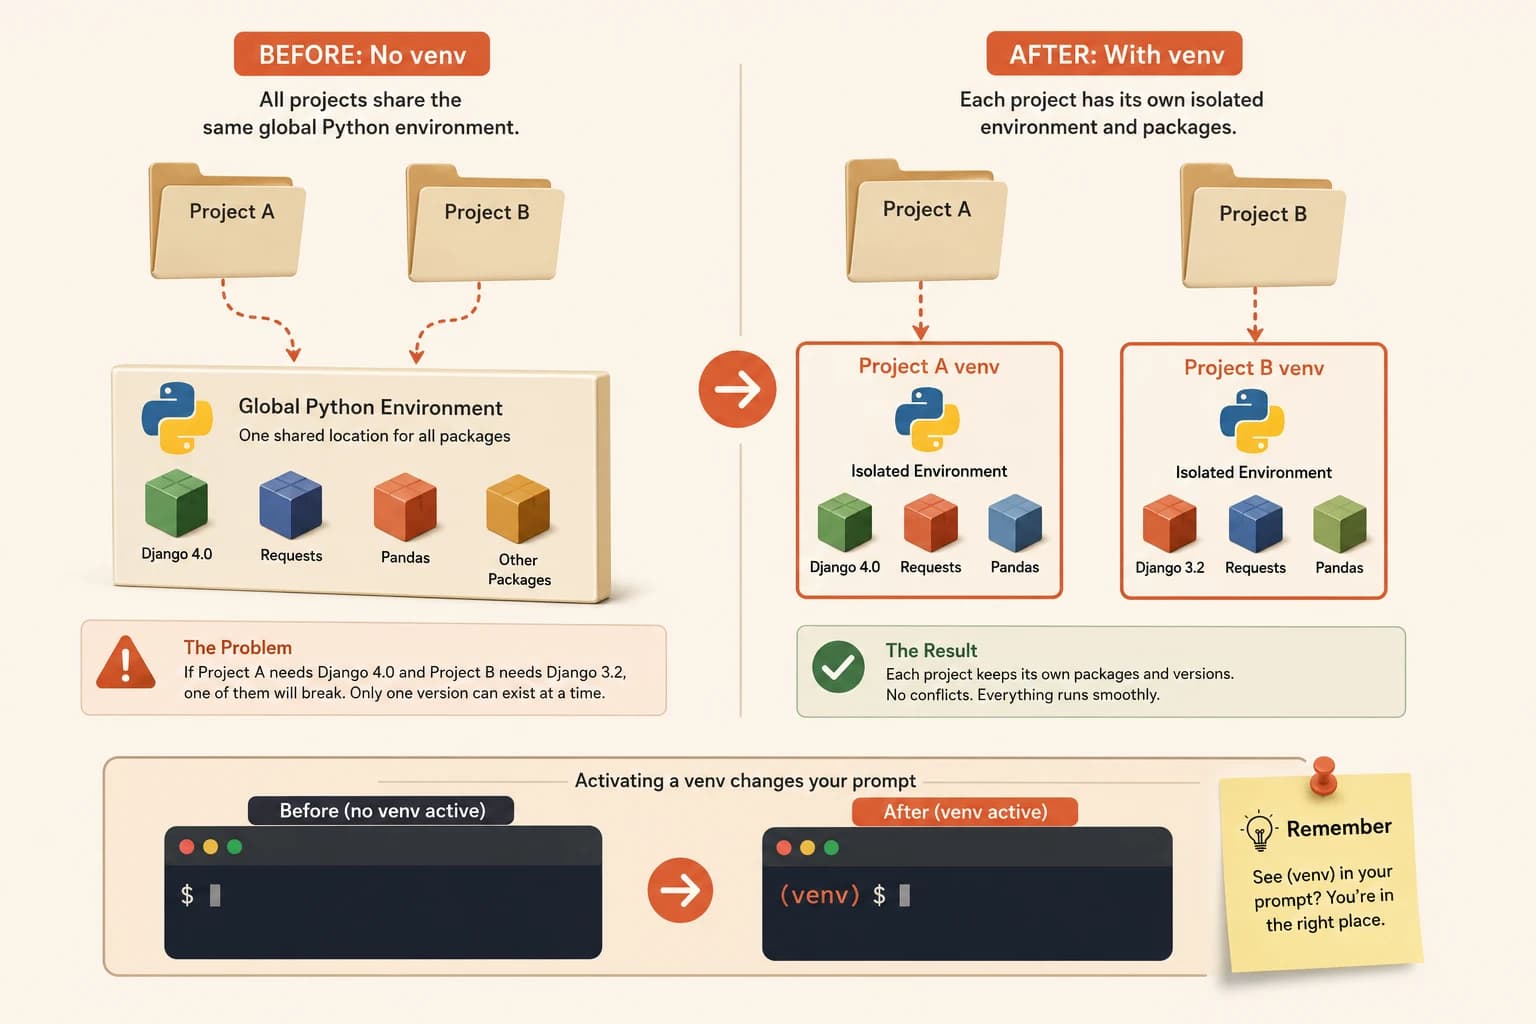
- A venv is a folder holding its own Python interpreter and its own packages, isolated from your system Python
- Without one, two projects needing different versions of the same package will conflict, one always breaks
python -m venv venvcreates it; activating it changes your terminal prompt to show(venv)- The #1 beginner mistake: running
pip installbefore activating, which installs globally instead of into the projectvenv/always goes in.gitignore, it's rebuilt fromrequirements.txt, never committed
What a Virtual Environment Actually Is
Every Python installation on your computer is, by default, one shared, global thing. Every project you write pulls its packages from that same single pool.
A virtual environment breaks that pool apart. Running python -m venv venv creates a folder containing a private copy of the Python interpreter and an empty space for packages, tied to that one project only. Installing a package while that venv is active puts it inside that folder, not into your system-wide Python.
Think of it as giving each project its own toolbox, instead of every project reaching into one shared drawer where tools get moved, replaced, or go missing.
Why You Need One
Here's the conflict a venv prevents. Say Project A needs Django 4.0, and Project B, sitting in a folder right next to it, needs Django 3.2.
With one global Python, only one version of Django can exist at a time. Install 4.0 for Project A, and Project B breaks. Install 3.2 for Project B, and Project A breaks. There's no way to satisfy both from the same shared pool.
Give each project its own venv, and the conflict disappears entirely. Project A's venv holds Django 4.0. Project B's venv holds Django 3.2. Neither knows the other exists.
This isn't a rare edge case, it's the default state of having more than one Python project on your machine. The moment you have two, you need this.
Creating and Activating a venv
Create the venv
From your project folder, run:
python -m venv venv
This creates a folder named venv containing a private Python interpreter. The first venv is the module doing the work, the second is just the folder name, you could call it anything, but venv is the convention everyone follows.
Activate it
On Mac/Linux:
source venv/bin/activate
On Windows:
venv\Scripts\activate
Your terminal prompt now shows (venv) at the start of the line. That prefix is your confirmation, everything you install from this point runs inside the isolated environment, not your global Python.
Deactivate when you're done
deactivate
One word, no arguments. The (venv) prefix disappears, and your terminal returns to using system Python. Your project files are untouched either way, deactivating just changes which Python interpreter is currently active.
The #1 Beginner Mistake
Forgetting to activate before running pip install is the single most common venv mistake, and it's silent. The command runs, packages appear to install fine, no error at all.
The problem only surfaces later: your script can't find a package that you're certain you installed, because it went into your global Python, not the project's venv.
If pip install anthropic succeeds but your script still says ModuleNotFoundError: No module named 'anthropic', check your prompt for (venv) first. Nine times out of ten, the package installed globally because the venv wasn't active when you ran the command.
The fix is always the same: activate first, then install. Order matters here exactly like it did with load_dotenv() in lesson 05.08, the environment has to be set up before the command that depends on it runs.
Deleting a broken venv is always safe. It's just a folder of copied files, none of it is your actual project code. Delete it, recreate it with python -m venv venv, reactivate, and reinstall.
Your Task
Create a venv and install anthropic inside it
In your project folder, run:
python -m venv venv
Activate it (Mac/Linux: source venv/bin/activate, Windows: venv\Scripts\activate). Confirm (venv) appears in your prompt. Then install the anthropic package, the one you'll use for every Claude API call in this course, from inside the active venv:
pip install anthropic
Run pip list and confirm anthropic appears in the output.
Done? You've completed Lesson 05.12, and Module 05. Next up: Module 06, Web Basics, where you'll learn how HTML, CSS, and JavaScript work together →
FAQ
Common questions
Finished reading?
Mark it complete to track your progress through the path.
Comments (0)
Be the first to leave a comment.