Supabase Setup: Your Free Hosted Postgres Database
Supabase gives you a free hosted Postgres database in under a minute. Here's how to create your first project and find your way around.

You type psql into your terminal to install Postgres locally, and get command not found. You try again with a different command from a five-year-old blog post. Twenty minutes later you're staring at a config file wondering if you broke your whole machine, and you haven't stored a single row of data yet.
Supabase skips all of that. It's a company that runs Postgres, a real production-grade database, on its own servers and hands you a finished project through a web dashboard. You click a button, wait about a minute, and you have a live database with no install, no config file, and nothing to break on your own laptop. This lesson walks you through creating that first project and finding your way around before your backend server ever needs to talk to it.
Key Takeaways
- Supabase gives you a hosted Postgres database for free, live in under two minutes, no local install required
- The Table Editor lets you create tables and rows by clicking, no SQL required to get started
- Row Level Security is on by default for a reason: it stops anyone but your app from touching your data
- The free tier includes 500MB of storage and pauses a project after about a week of inactivity
- Your project's API keys live under Settings, and you'll need them in the next lesson
What Is Supabase, Actually?
Supabase is a hosted version of Postgres with extras built on top: instant APIs, a dashboard, authentication, and file storage, all pointed at one real database. You covered what Postgres actually is (a relational database queried with SQL) in the database basics lesson; Supabase is where you actually get one running.
Skip this step and try to install Postgres on your own machine instead, and you'll spend an afternoon on driver versions and port conflicts before writing a single line of app code. Supabase trades that setup time for a sign-up form.
Every Supabase project ships with the same four pieces: a Table Editor for viewing and editing data visually, a SQL Editor for writing raw queries, an auto-generated API for reading and writing from code, and a Settings page holding your keys. You'll use all four eventually, but only two matter for this lesson.
Creating Your First Supabase Project
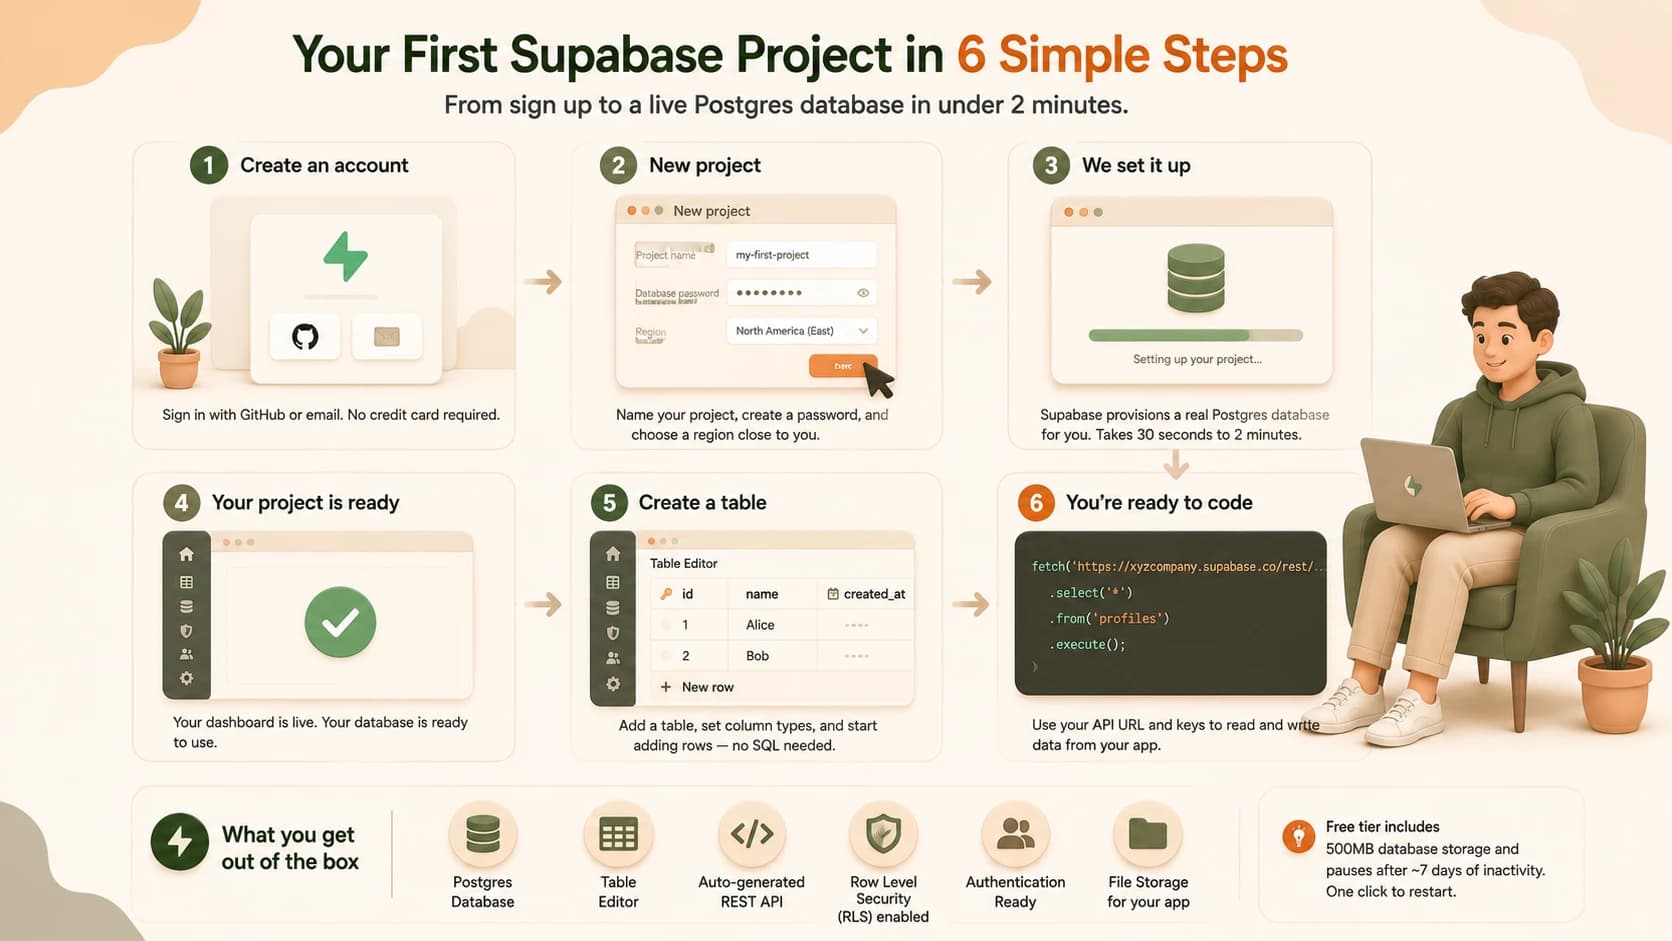
Go to supabase.com and click "Start your project." Sign in with GitHub or an email address, no card needed.
Once you're signed in, click "New project." Give it a name you'll recognize later, pick a database password (Supabase will offer to generate one, and you should let it), and choose a region close to you. Then click "Create new project."
Supabase spins up an actual dedicated Postgres instance behind the scenes, so the dashboard shows a short "setting up your project" screen while that happens. It usually takes thirty seconds to two minutes. Pick the region carefully. You can't move a project between regions later without exporting and reimporting your data, so guessing wrong here means real rework down the line.
A Tour of the Dashboard
Once your project is ready, you land on the dashboard's home page. The two tabs you'll use constantly are Table Editor and SQL Editor, both in the left sidebar.
The Table Editor looks and behaves like a spreadsheet. Click "New table," name it, add a few columns with their types (text, number, timestamp), and save. You can then click into the table and add rows one at a time, the same way you'd fill in a spreadsheet.
The SQL Editor is a blank query window where you can write and run raw SQL, useful once you've learned the basics in the SQL lesson. For now, the Table Editor is enough to create something real.
Your project's API keys live under Settings, then API, in the left sidebar. You'll find a Project URL and two keys: an anon key and a service role key. Not knowing where this page is will stop you cold in the next lesson, where you connect a Python script to this exact project, so it's worth opening it once now just to see it.
Bookmark your project's Settings > API page now. You'll copy the Project URL and anon key from here constantly while you're learning.
Why Row Level Security Is On By Default
Create a new table in the Table Editor and you'll notice "Enable Row Level Security" is already switched on. Leave it on. I've seen this exact moment trip up nearly every beginner I've walked through this lesson: the error message shows up, and the fastest-looking fix is also the wrong one.
Row Level Security, or RLS, means the database itself checks every single read or write against a policy you define, before it happens. Try to query a table with RLS on and no policy written yet, and you'll get an error that reads something like "permission denied for table." Your first instinct will be to find the RLS toggle and switch it off to make the error disappear.
Do that, and here's what actually breaks: your table becomes readable and writable by anyone who has your project's public API URL, not just your own app. The error going away doesn't mean the problem is fixed, it means the lock is gone. The right fix is writing a policy that says who can do what (you'll cover this properly once you're calling the API from code), not removing the lock entirely.
A "permission denied" error from RLS is the database working correctly, not a bug. Write a policy to grant access. Never disable RLS to make the error go away.
What the Free Tier Actually Gives You
Supabase's free tier isn't a trial, it's a permanent plan with real limits, and knowing them upfront saves you a confusing moment later. You get 500MB of database storage, which is far more than a learning project needs, and unlimited API requests within fair use.
The one limit that surprises people: a free project pauses itself after about a week with no activity. Your data isn't deleted, but the project stops running until you open the dashboard and click to restore it, which takes a minute or two. If you come back to a project after a break and it looks offline, that's why, not a sign anything went wrong.
Supabase free tier at a glance
| Limit | Free tier |
|---|---|
| Database storage | 500MB |
| Card required to sign up | No |
| Inactivity pause | After ~1 week of no activity |
| Restoring a paused project | One click, takes a minute or two |
Your Task
Create your Supabase project
Go to supabase.com, sign in, and click "New project." Name it something like "seekvana-practice," let Supabase generate a database password, pick your nearest region, and click "Create new project." Wait for the setup screen to finish.
Create one table by hand
In the Table Editor, click "New table." Name it "notes," add one text column called "content," and leave Row Level Security enabled. Save it, then click into the table and add one row with any sentence you want in "content."
Find your API keys
Go to Settings, then API. Look at the Project URL and the anon key. You don't need to copy them anywhere yet, just confirm you know where this page lives, since the next lesson uses both.
Done? You've completed Lesson 07.04.
FAQ