How to Connect a Custom Domain to Vercel (Beginner Guide)
Connecting a custom domain means adding it on your platform, then adding one DNS record at your registrar. Here's the exact pattern and how long it takes.

You bought the domain, added it to your Vercel dashboard, pasted in the record it asked for, and opened your shiny new custom domain in the browser. Blank page. You refresh. Still blank. You refresh again, check the record three more times, and start to wonder what you broke. You broke nothing. What you're looking at is DNS quietly catching up, and by the end of this lesson that blank page will read as "wait a bit," not "start over."
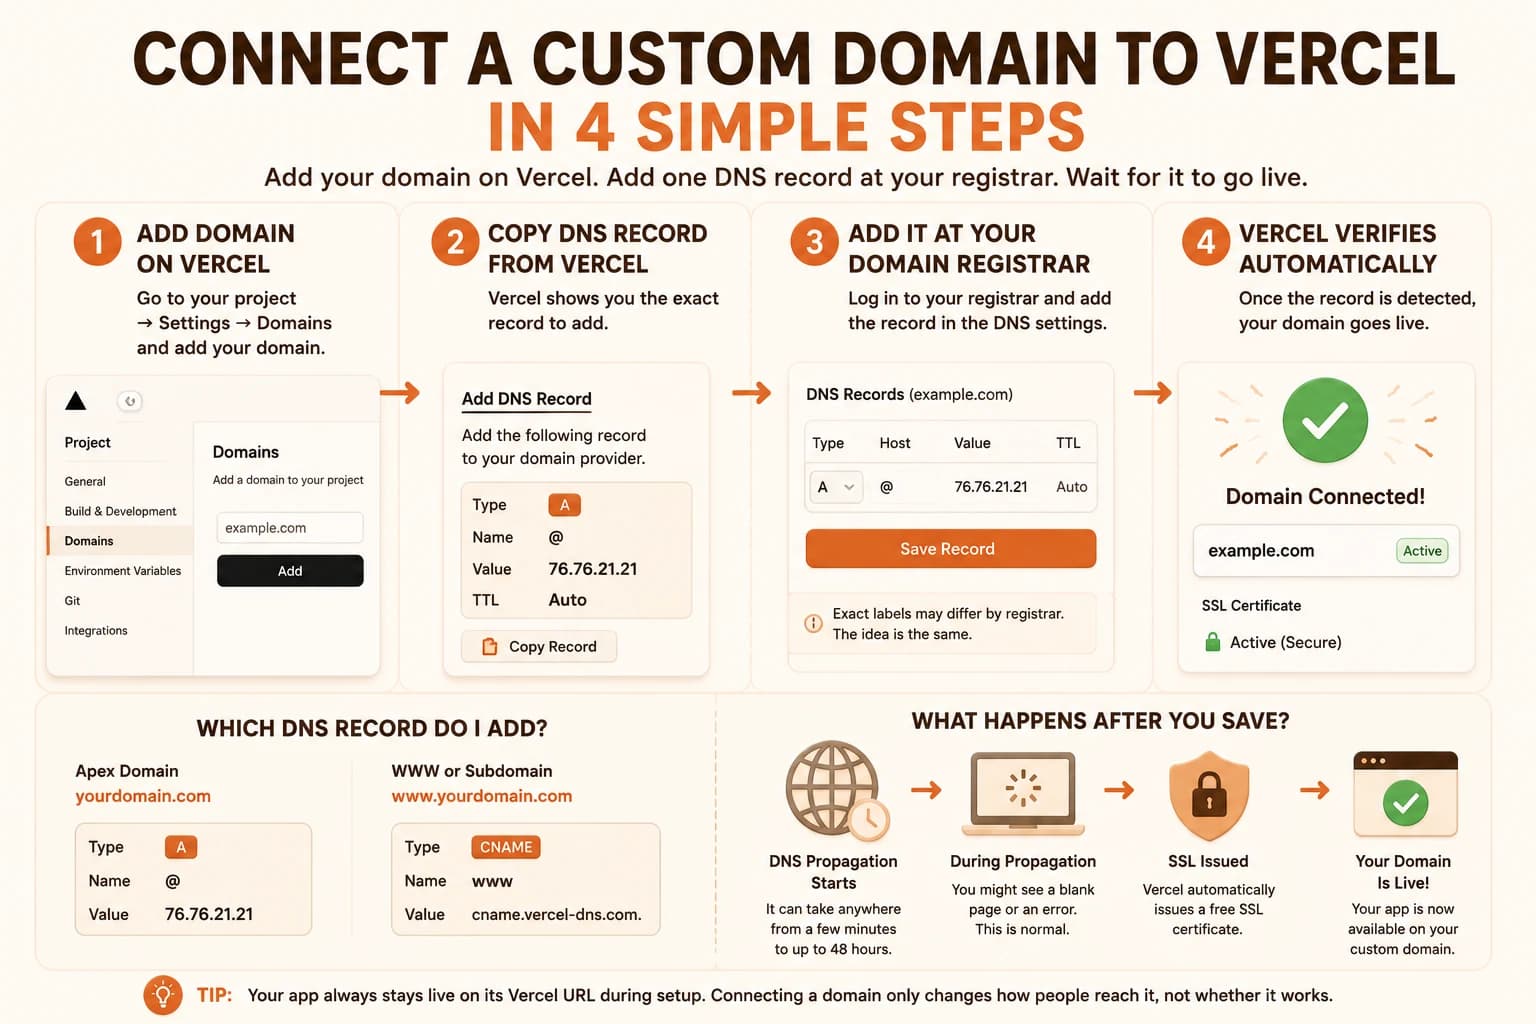
To connect a custom domain to a deployed app, you add the domain in your hosting platform's dashboard, the platform hands you one or two DNS records, you add those records at your domain registrar, and the platform verifies them for you. That's the whole shape of it. The rest of this lesson is where each of those steps happens, which record you add, and why the result never appears instantly.
Key Takeaways
- The setup lives in two places: you add the domain on your platform, and you add the DNS record at your registrar
- The platform tells you the exact record to add, you never have to invent it
- An apex domain like example.com usually needs an A record; a www or subdomain uses a CNAME
- After saving, expect a wait of minutes to about 48 hours, a blank page early on is normal, not broken
- HTTPS with the padlock is issued automatically and free once the domain verifies
How Do You Connect a Custom Domain to a Deployed App?
You connect a custom domain in four moves: add the domain inside your platform's dashboard, copy the DNS record the platform gives you, paste that record into your domain registrar's settings, then wait for the platform to verify it. Your app keeps running the whole time at its free URL, so nothing goes down while you do this.
That pattern is the same on every host you met in this module. On Vercel, where you deployed your frontend, it lives under Settings then Domains. On Render, where you might run a backend, it lives under the service's Custom Domains section. The buttons differ, the four moves do not. Learn the pattern once and you can connect a domain anywhere.
Skip the pattern and you end up guessing, which usually means pasting a record into the wrong tool and staring at a page that never changes.
The Two Places This Happens: Your Platform and Your Registrar
Here is the single thing that confuses almost everyone the first time. The setup is split across two separate websites, and they do two different jobs.
Your platform (Vercel, Render, Netlify) is where your app already lives. When you add a domain there, the platform's only job is to tell you: "add this record, with this value, and I'll recognize your domain when it points at me." It doesn't create the record itself.
Your registrar (Namecheap, GoDaddy, wherever you rented the name) is where the record actually gets created. This is the settings page that controls what your domain points at. The record the platform gave you goes here, in the DNS section.
Adding the domain on your platform does nothing on its own, and neither does poking around your registrar without the platform's record. The connection only exists once the record from the platform is saved at the registrar. That's the click most first-timers miss.
The direction is always platform first, registrar second. The platform is the destination telling you its address. The registrar is the phonebook entry you update so lookups point there. Get this backwards and you will do everything "right" in one place while the other place never hears about it.
A Record or CNAME? Which One You Add, and Why
The platform will ask you to add one of two record types, and it tells you which. You don't have to decide. But knowing what they are stops the setup screen from looking like a foreign language.
An A record points a name straight at a numeric server address, an IP like 76.76.21.21. Think of it as writing down an exact street address. A CNAME record points one name at another name instead of an IP, more like call-forwarding: "when someone asks for this, send them to that other address." Which one you use depends on whether you are pointing the root of your domain or a subdomain.
A record vs CNAME record
| Record type | Points at | Typical use |
|---|---|---|
| A record | A numeric IP address | The apex/root domain, like example.com |
| CNAME record | Another domain name | A subdomain, like www.example.com |
Most hosts, Vercel included, will suggest an A record for your bare domain and a CNAME for the www version, then offer to redirect one to the other so both work. You just copy the exact values shown. If you add the wrong type, the lookup finds nothing and the domain simply never loads, no error message, just silence, which is why people swear they "did everything right."
How Long Until It Works (and Why Nothing Seems to Happen at First)
This is the part no one warns you about, so it feels like failure when it is just physics. After you save the record, the change has to spread across DNS servers all over the world, and they each cache the old answer for a while before picking up the new one. That spreading is called propagation.
In practice it is usually a few minutes to a few hours. The honest ceiling is about 48 hours in rare cases. During that window, some visitors (sometimes including you) still get routed to the old, empty answer, so your domain looks blank or errors out even though your records are correct. This is the exact moment people panic, delete their perfectly good record, and start over, which resets the clock and actually does make it slower.
The first time I connected a domain, I refreshed that dead page maybe thirty times in ten minutes, certain I'd typed the record in wrong. I hadn't. It needed about another twenty minutes, and the fix was to close the tab and go do something else. That's the whole skill here: recognizing the wait for what it is.
If your records look right and the domain isn't loading, the best move is almost always to wait, not to change anything. Come back in an hour. "I did everything right and it still doesn't work" is the most common DNS complaint online, and the answer is nearly always propagation.
One quiet bonus while you wait: once the platform verifies your domain, it issues an HTTPS certificate for you automatically, for free. The padlock in the address bar appears on its own. You do not buy it, install it, or renew it by hand.
Free Hosting, Paid Domain: The One Thing That Costs Money
Everything you have deployed in this module has been free, and it stays free after you connect a custom domain. Connecting the two costs nothing. But the domain name itself is the one piece of going live that you pay for, because it is a yearly rental from your registrar, the same rental you saw when you searched for a name in the last lesson.
For a typical .com that is roughly ten to fifteen dollars a year. That's it, that's the whole bill for a real, professional-looking address on top of free hosting. It is a small, clean line item, and it is worth naming plainly now so it is not a surprise later when you decide which projects deserve a real name and which are fine on the free platform URL.
Ready to keep building toward your first real, named project? The Getting Started path has the rest of the sequence lined up for you.
Read Vercel's domain connection screen
Open your project from the Vercel deploy lesson in the Vercel dashboard and go to Settings then Domains.
Read through the screen even if you don't own a domain to connect yet. Notice two things: what it asks you to type in, and what DNS record type it says to add at your registrar.
Write the general steps down in your own words, platform first, registrar second. You will follow this exact process the day you own a domain for a real project.
Done? You've completed Lesson 09.12.
FAQ