How to Deploy to Vercel for Beginners (Free & Fast)
Learn how to deploy to Vercel for beginners: connect GitHub, import your repo, and get a free, live .vercel.app URL in about a minute.

Your index.html from Module 06 loads perfectly. The layout is right, the styling holds, everything works, on your laptop. Then you close the lid and it's gone. You text the file to a friend and it opens as a broken local page with missing images, not a real website. The page is finished. Nobody but you can reach it.
This lesson closes that gap. You'll learn how to deploy to Vercel, the platform this course uses for frontend files, and get that same page live on a public URL anyone can open, in about a minute, for free. Vercel is the default recommendation here for one reason: it takes you from "code on my laptop" to "live link I can send anyone" faster than almost anything else.
Key Takeaways
- Deploying to Vercel means connecting your GitHub account, letting Vercel copy your files onto its always-on servers, and getting back a public URL ending in
.vercel.app- Vercel's free Hobby tier needs no credit card and handles learning projects comfortably
- Once connected, every
git pushtriggers a new deployment automatically, no manual upload step, ever- A build that says "success" but shows a 404 is usually a capitalized filename or wrong output folder, not a broken deploy
What Vercel Does When You Deploy
Before the clicks, the mental model, because knowing what's actually happening is the difference between following steps blindly and being able to fix things when they go sideways.
When you deploy to Vercel, three plain things happen. Vercel connects to your GitHub account, the same GitHub you set up in Module 04. It copies the files from one of your repositories onto its own servers, computers in a data center that never sleep and are always connected to the internet. Then it hands you a public address, something like your-project.vercel.app, that points directly at those files.
That's the whole thing. A copy, an always-on host, and a URL. This is exactly what deployment means from lesson 09.01, made concrete on one specific platform. Nothing about your code changes. The same index.html a browser opened on your laptop is the same file Vercel now serves to anyone who visits the link.
If you skip this model and just memorize the buttons, the first time a deploy misbehaves you'll be stuck. If you understand that Vercel is copying files and serving them, a 404 stops being scary and starts being a question you can answer: is the file where Vercel expects it? The official Vercel deployments documentation walks through the same flow if you want the formal version.
How to Deploy to Vercel, Step by Step
Here's the fastest path from a static page on your laptop to a live URL. The short version: push your files to GitHub, import the repo into Vercel, and click Deploy. Vercel does the rest and gives you a link in about a minute.
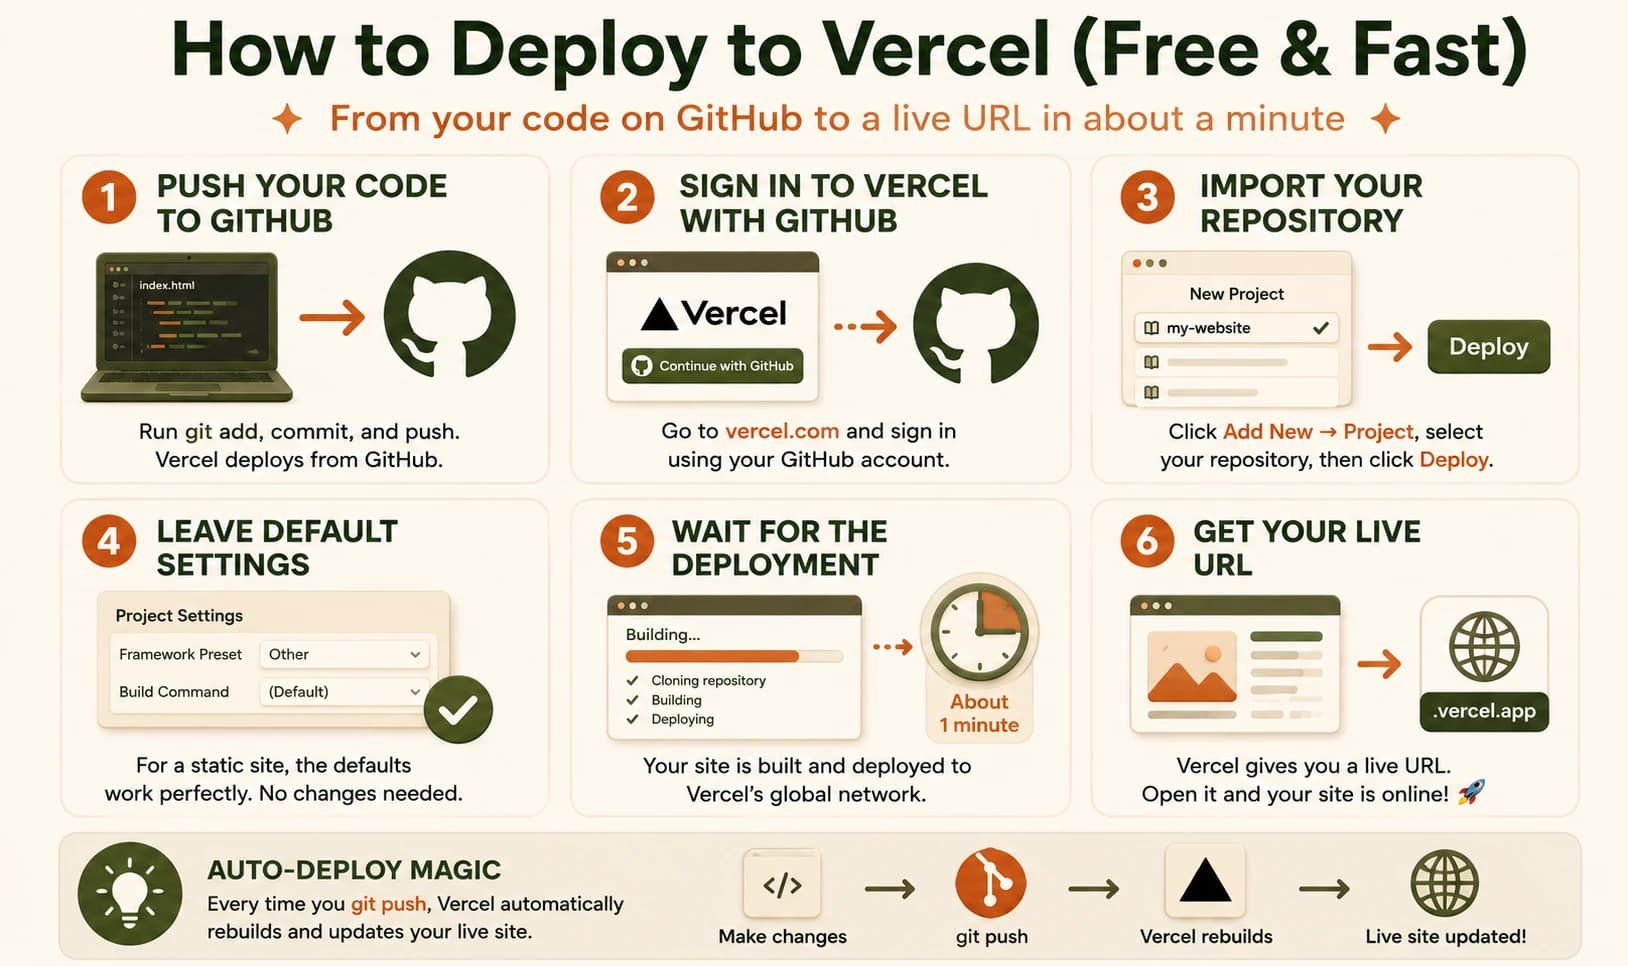
Here's exactly what you do, in order:
- Make sure your
index.htmlis pushed to a GitHub repository. This is the git add, commit, and push workflow from lesson 04.03. Vercel deploys from GitHub, so if the code isn't there yet, there's nothing to import. - Go to vercel.com and create a free account. Sign in with GitHub, which links the two automatically. No credit card is asked for on this tier.
- Click Add New, then Project, and select the repository you just pushed.
- Click Deploy and accept the default settings. For a plain static site, you usually don't need to change anything.
- Wait about a minute. Vercel gives you a live URL ending in
.vercel.app. Open it in any browser.
That's it. The page that only you could see is now reachable by anyone with the link. The step people miss is the first one: Vercel imports from GitHub, so a repo that isn't pushed yet is the most common reason "nothing shows up." Everything else is accepting defaults. And to be clear on cost, the free tier really is free here, no trial clock, no card, as Vercel's pricing page spells out.
Auto-Deploy: The Part That Changes How You Work
Deploying once is useful. What makes Vercel genuinely change your workflow is what happens after: auto-deploy.
Once your repository is connected, every single git push to it triggers a brand-new deployment automatically. Change a heading, push, and Vercel rebuilds and swaps in the new version, usually live within seconds to a minute. You never "upload" anything again. Your live site simply tracks your GitHub repo.
I still remember how strange this felt the first time. I'd expected deployment to be a careful, manual ritual I'd dread repeating. Instead, editing a live website became identical to saving my work: change code, push, done. That's the loop you'll use from now on, and it's part of the same Getting Started path that's carried you through every module so far.
Here's the stake if you don't internalize it: beginners who don't know about auto-deploy either re-drag their files every time, which is slow and error-prone, or they get scared to touch a site once it's live, in case they break it. Neither is necessary. The push you already know is the deploy. If a push ever breaks the live version, Vercel keeps a history of past deployments, so you can roll back to a working one in a couple of clicks. For exactly what happens behind the scenes during that rebuild, see how auto-deploy actually works.
What "Free" Actually Means on Vercel
"Free" always deserves a straight answer, so here it is. Vercel's Hobby tier is genuinely free, with no credit card and no expiry. For a learning project, a portfolio, or a small tool you share with friends, you will almost certainly never pay a cent.
It does have real limits, worth knowing so nothing surprises you: around 100GB of bandwidth a month and caps on things like function calls, and it's meant for personal, non-commercial use. The important part is what happens when you hit a limit. Vercel pauses the affected feature, usually for about 30 days until it resets, rather than sending you a bill. There's no overage charge waiting to ambush you, which is exactly the reassurance a first-time deployer needs.
One more honest heads-up, because it trips up nearly everyone once. Sometimes your build shows "success" but the live page returns a 404. Don't panic, and don't assume you broke something deep. The usual culprit is a capitalized filename: Vercel's servers are case-sensitive, so Index.html and index.html are two different files to them, even though your laptop treated them as the same. Rename it to lowercase index.html, or leave Vercel's default settings alone, push again, and it resolves. Knowing this in advance turns a confusing evening into a ten-second fix.
If you'd rather not use GitHub at all for a quick test, Vercel Drop lets you drag a folder straight into your browser to deploy it. GitHub is still the better default here, because it's what unlocks the auto-deploy loop above.
Deploy your first page to Vercel
Make sure your index.html from lesson 06.01 is pushed to a GitHub repository. If you need a refresher on git add, git commit, and git push, revisit lesson 04.03.
Go to vercel.com and create a free account, signing in with GitHub.
Click Add New, then Project, select your repository, and click Deploy, accepting the default settings.
Wait about a minute. Vercel gives you a live URL ending in .vercel.app. Open it in your browser. Your page is now live on the internet, reachable by anyone with the link.
Done? You've completed Lesson 09.03.
FAQ